Blurry fonts windows 10 the selection checkbox has disappeared. Fixing blurry font in Windows
How to fix blurry font in Windows 10 so that the image becomes clear and easy to read? In Windows 10, compared to other operating systems, the problem with blurry images has become more common. The fact is that Microsoft has changed the algorithm for smoothing and displaying images and text. All this was done for the sake of the ever-increasing resolution of screens - Full HD, 2K, 4K screens - on each of them the display should be the same, depending on the scaling.
If you are faced with the problem that in Windows 10 the font is blurred only in applications and system utilities, first make sure that you have the latest version of the system installed.
Previously, the problem arose due to automatic scaling settings; the system determined the size and resolution of the screen, and then set the desired scale. Along with the resolution of desktop and interface elements, the font suffered, as it was not optimized for the required size. This applies to Windows 10 versions 1507, 1511 and 1607, to find out your OS version, run the winver command

or go through Settings – System – About the system (About the program) and find out your OS version.

Now that the Creators Update (1703) is out, Windows 10's blurry font issues when scaling should be resolved. In the Fall Creators Update (1709), the scaling and anti-aliasing algorithm was slightly adjusted, so this problem may not be relevant for most users.
According to personal observations, after the release of version 1703, the number of calls to technical support with problems with blurred fonts decreased several times. In order to do so, please read the separate article. For those who have this problem, the following tips should help.
How to remove blurry font on Windows 10
The main cause of blur was incorrect scaling. In order to change it and set the correct one, you need to go to Options - System

Then select Display and in the item Scale and layout item will be displayed Change the size of text, apps, and other elements.
Set the Scale to the recommended value and log out of your user account for the changes to take effect.

With standard screen sizes (HD, Full HD), scaling is excessive; with 2K and 4K screens, scaling can be turned on automatically, because all interface elements will be extremely small.
Also make sure that your screen resolution is set to the correct one. If you set the screen resolution incorrectly (for example, a monitor with a resolution of 1920x1080, but it is set to 1280x1024), you may notice image distortion - blurriness, pixelation, jagged edges, etc.
The video adapter driver is responsible for correct display, as well as resolution and scaling. If this situation occurs after installation, system update or failure, try updating the video card driver.
Open Device Manager (right click on the start button):

Open the Video adapters tab and select the desired video card, right-click and select Update driver.

Or use an alternative method and download drivers from the manufacturer’s website.
After all the updates, try setting the recommended scaling and screen resolution, in most cases, the problem will be solved.
Setting ClearType
There are cases when, after cumulative updates in Windows 10, the font becomes blurry, the reason may be resetting ClearType settings - a text smoothing technology.
To configure it again, open the search menu (Win+S), enter the query ClearType and select Setting ClearType Text.

The Text Customizer opens and prompts you to turn on ClearType and choose from a selection of text display options to calibrate the feature.


When finished, check the clarity of the text in applications that use system fonts - the blurring should go away.
Blurry text in apps
It happens that in Windows 10 the font is blurry only in programs; in system applications everything is fine. In this case, this can also be affected by scaling; to enable/disable for a specific application, you need to follow the following recommendations:
- Right-click on the application shortcut and open Properties
- Go to the Compatibility tab
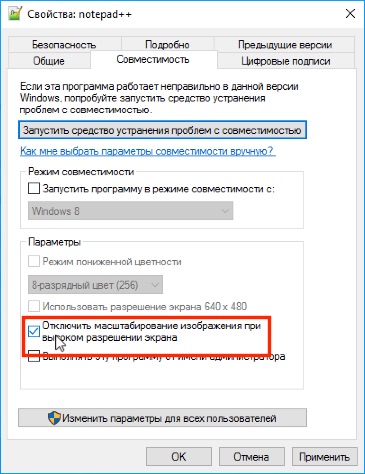
- For versions 1507, 1511 or 1607 you need to check the box "Disable image scaling on high screen resolutions"
- For Windows 10 versions 1703, 1709 and older, you need to check the "Override high resolution scaling mode" and select one of the modes Application, System or System (Advanced)

Additionally
Manual scaling adjustment
It can help with setting up a convenient display of system elements, and also fix the problem of blurred fonts. The setting is located in Settings – System – Display – Custom scaling. You can set the scale in the range from 100% to 500%.

Windows 10 DPI Fix
If none of the suggested options helped you, try using the Windows 10 DPI Fix utility.

Launch the program and select the desired scaling method: Old (Windows 8.1) or new (Windows 10), and also set the scaling percentage.
There are several features of this application:
- Don't disable it from startup
- In the Edge browser, some Adobe Flash Player elements may appear smaller than expected. In other browsers (Chrome, Yandex, IE, Opera or FireFox) the display is performed correctly.
If the suggested options did not help you, then write in the comments what problem you encountered, we will try to answer and help you.
Have a great day!
After installing Windows 10, users run the risk of encountering blurred fonts. They can manifest themselves throughout the system or in individual applications. Most often, this problem is associated with a new scaling method that Microsoft has used in the Windows 10 operating system. On high-resolution screens, the system tends to automatically set the scaling to a level above 100%, which is why some blurriness appears. Here are some tips to help you fix blurry fonts in Windows 10.
How to disable scaling in Windows 10
As mentioned above, most often the problem of blurred fonts is associated with the new zoom feature. It can operate system-wide or within a specific application. Let's look at how to disable scaling in both cases.
Throughout the system

If the method described above did not help change the situation with blurry fonts throughout the operating system, here are some more tips on what you can do in such a situation:

If none of the above tips help you get rid of blurry fonts in Windows 10, we recommend reverting back to the old scaling method, which is discussed below.
In a separate application
If a blurry font problem exists in one application, it is much easier to find the cause than when it is present throughout the system. Right-click on the shortcut or executable file of the application that has the described problems and select "Properties".

You will need to restart the application for the changes to take effect. Please note that when you close some applications, they continue to run in the background.
How to return the old scaling method in Windows 10
If none of the tips above helped get rid of blurry fonts in Windows 10, you can try reverting back to the old scaling mode. There are two ways to return the old scaling mode in Windows 10 - using special applications or manually, we will consider both options.
Manual method
You can return to the old scaling method in Windows 10 by changing some registry settings. This is most conveniently done using an executable file, which can be created using a regular notepad. Do the following:

It is worth noting that when you restart the computer, the registry will again update the changed values. To prevent this from happening, launch the “Run” line using the Windows + R key combination. Enter the shell:Startup command in it, which will open the startup folder. Place the previously created file in it, after which it will be automatically executed every time Windows boots.
Method using a special application
The steps described above for making changes to the registry can be performed with a simple Windows 10 DPI Fix application, which is available for free on the official developer website. After downloading this application, launch it and select the required scaling method - new or old, then click “Apply”.
When it comes to the point that not only your eyes, but also your hands begin to itch from looking at the screen - this is already a consequence - then this is a sure sign that the time has come to change something! But today no one will receive a monitor, because we have more than one solution to the problem! What are we going to talk about? Blurred fonts in Windows 10 and ways to fix them!
Find out in different ways! Helpful information!
There are users who are not significantly affected by problems with Windows 10. And some did not have any complaints at all. But, as practice shows (as discussed in our previous articles), the procedure for installing and further using Windows 10 is still quite painful for some users. Painful for their skull! But let's not forget that there were problems in previous Windows too. And they decided! And we will figure out what needs to be done in this situation!


Well, let's immediately decide that DPI- this is permission. Affects Windows fonts. This abbreviation is translated literally Dots Per Inch - how many dots are in an inch? It would be more correct to use this for printers. On the screen you have not dots, but pixels, i.e. Regarding the monitor, you can say Pixels Per Inch – PPI. But now no one cares about it, many don’t see the difference, and those who know it don’t really care. Even in the English-language program, which will help you solve the problem if other methods do not help, it is clearly written DPI!
What's the matter? And the crux of the matter is that MicroSoft decided to change the scaling system DPI. Innovation existed back in the days Windows 8.1, but later it was used in the next tenth version. It didn't turn out very well, because... On Windows 10, blurry fonts began to primarily annoy those with high resolution. It is enough to have from 120 DPI, or an incompatible application without DPI - AWARE to feel like you're in IMAX 3D without glasses!
Let's look at how you can solve the problem within one application!
For example browser! Don’t worry that some moments in the screenshots may be of English origin - we will help you and translate everything! This, by the way, will help those who have the English version for some reason.
So, first let's move on to the application properties, in this case the experimental creature will be FireFox! You need to find it among the other tabs Compatibility , and select a point in it by checking the box indicated in the picture. Those. We disable scaling if the screen resolution is high.

Apply – Apply . After this, we run the test subject to check for blurry text and look at the result! It worked - read on! It didn’t work out - read on twice as fast!
We reduce the settings of the system itself for issuing DPI in Windows 10!
The point here is that the problem is solved if the scaling value is e.g. 100% . The best option. As has already been determined, the joint comes out when 125%< (и большем значении) . What are we doing? Let's reduce this value!
Control panel – we continue to print Settings – Settings in the Russian version.

Select the menu and then the top section - Display – Display – Screen . See the slider? So, it’s impossible to make less than a hundred, so we move it to the extreme (see screenshot) left position! A good way to change the font. If you're a little confused about the side, no problem! I get confused too, that's why I love the pictures! Look below!

Reboot your iron friend and look at the result! There is another option if, again, you fail...
How to coolly return to the old and well-working method of scaling?!
There is such a way, but you will need to create a file .cmd extensions. Then you will be able to use the scaling currently used in Windows 7 and the release Windows 8.

To begin, simply create a text document - a regular notepad and copy the following commands into it:
REG ADD "HKCU\Control Panel\Desktop" /v DpiScalingVer /t REG_DWORD /d 0x00001018 /f
REG ADD "HKCU\Control Panel\Desktop" /v Win8DpiScaling /t REG_DWORD /d 0x00000001 /f
REG ADD "HKCU\Control Panel\Desktop" /v LogPixels /t REG_DWORD /d 0x00000078 /f
Click Save as… Where you need to specify a file name, you write its name and another extension to change the font size. Let in our case the name be dpi_fixing- then, if you take into account the extension, you will have to write
dpi_fixing.cmd
This file must be run indicating that you Administrator. After this, restart your PC. It's better, of course, to throw it in Autoload , because the setting may be lost. That's what the folder is called. You can find her through a search, or look at the path to her in the picture - in English her name will be Startup .

You can also solve the problem using fairly simple software. With Windows 10 DPI Fix it's quite easy!
Download - the link is given at the end of the article! We indicate everything by analogy with the picture. Because you use scaling from 8.1, and even modified, then 125% is possible - there is no error here! Then you need to reboot!

We hope that you have solved the problems and the blurry font is no longer an eyesore! We will be glad to see your comments! Thank you for your attention!
Users of the new and super popular Windows 10 operating system have noticed a problem with the display of fonts in a number of applications. Text is no longer clear when auto-zoom is turned on. Unfortunately, this function is not sufficiently developed. The developers promise to fix the matter in the very near future, and we can either wait and accept it, or look for artisanal ways to solve the problem. We will talk about some of these methods further.
Blurry fonts in Windows 10 are a real problem that can ruin the lives of anyone who needs text to appear correctly on the screen.
 Progress has its costs; the console's alphanumeric matrix had no problems with fonts. Each letter was hardwired into the permanent memory of a display device - a monitor or a printer - and, as a rule, there were no problems with displaying fonts in such systems. Only the choice of fonts was too small. More precisely, he was practically absent. If we want to have a beautiful picture and texts with different fonts, then we have to put up with the mistakes of the developers. In Windows 10, traces of such mistakes are still visible everywhere.
How to disable scaling?
Scaling is a new Windows 10 service designed to adjust the quality of screen content. If the system detects a high screen resolution, it may display the window at a ratio other than 1:1 to the original size. This leads to various excesses, such as deterioration in the readability of text in windows. This Windows 10 service does not wait for our desire and turns on when it deems it necessary. The second disadvantage of scaling is the launch of this service at the moment the operating system starts. If we do not want to use its services, then we will have to make additional efforts.
You can disable font scaling in Windows 10 both for an individual application and for the OS as a whole. To remove scaling in the window of a specific application, you need to open the properties window of the shortcut of this application and remove the switch "Disable scaling at high screen resolutions" as shown in the picture:
 You can achieve the same effect throughout Windows 10 in another way:
- Go to the Start menu.
- Go down to the submenu “System” -> “Screen”.
- We fix the font scaling parameter to 100%. To do this, drag the slider to the far left position. There is only one slider, so you can't go wrong.
other methods
There are other ways to fix blurry fonts in Windows 10. The first is to return to the old text display system inherited from previous versions of the operating system. To do this you need to do the following:
Create a text document with the following content:
 This is a system registry command file that allows you to automatically assign values to its keys. Save this file with the extension “.bat” (you can choose any name) and launch it with a mouse click. The file commands revert the system to the old font system. Just remember to reboot your computer.
It is possible to overcome blurry font display in Windows 10 using a third-party program specially written for this purpose. This program is called “Windows 10 DPI Fix”, and you can download it from the manufacturer’s website at http://windows10_dpi_blurry_fix.xpexplorer.com/. Download the program file from the website, run it for execution and get a window that looks something like this.
Blurry fonts in Windows 10 are a fairly common situation that users encounter. I have repeatedly received letters asking for help to solve this problem.
Since I do not use Windows 10 and have not encountered such a problem, I am 100% theoretician.
However, I tried to understand the situation and, I hope, the material that I collected will help you solve this problem if you are faced with it.
The problem is due to the fact that Windows 10 uses a different principle for smoothing and scaling fonts than in previous versions of the operating system. Therefore, fonts may not appear clearly on some monitors.
This typically occurs on larger monitors when the system automatically applies font scaling to make text more readable.
If the problem does not occur on large monitors, then first of all you should pay attention to such a banal thing for most users as screen resolution. Many novice users do not know what it is and I have a video on this topic: “”.
The screen resolution should be optimal for your monitor. If this is not the case, the image on the screen may be stretched and the fonts may not be clear.
But if everything is fine with the resolution, then the problem is most likely related to the font scaling settings.
Font scaling is configured in Display Settings. Here you should set 100% if it was, for example, 125%.

You will then need to click on the “Log Out Now” button to log out and apply the settings. After logging in, the font blur should disappear, but the texts will not be very readable, as they will become small.
Let's go to the screen options again and go to "Advanced screen options":


Here the scaling is also set as a percentage and we can also try to experiment with the scale.

If, however, the blur disappears only 100%, then set it to 100%.
To increase the font sizes for individual elements of the operating system, we will use the appropriate settings in the same window.

For individual Windows elements, we can set the font size and make the text more readable. But these settings relate exclusively to the operating system and do not affect programs. In programs, texts will remain small.
If, using this window, you were able to resize the texts to an acceptable size and the blurriness disappeared, then you should also not forget about the programs.
Not all programs support font scaling, so it is quite possible that one or more programs will have blurry fonts, while other programs will display fonts clearly.
In this case, we need to find the program's executable file and set some parameters for its launch. You can find the executable file, for example, through the Start menu. First we will need to find the shortcut itself on the disk:

Then from the context menu we can find the executable file:


And on the “Compatibility” tab, check the “Disable image scaling at high screen resolution” checkbox:
After applying the settings, the blurriness in this particular program will disappear, but the texts will also become small. This operation will need to be done for all problematic programs.
This is probably all we can do to fix the problem using standard Windows settings.
If the described measures do not help, then you can disable the new (decimal) font scaling and use the scaling from the previous version of the operating system. True, this is done in the registry, and as you know, it’s not something to joke with. Therefore, whatever you do next, you do at your own peril and risk :)
I will not show where and what needs to be changed in the registry, since it is very easy to enter data into the registry using a special file. You can download it.
If you open the file using a text editor, you will find registry branches inside where the settings are changed.

If you wish, you can create or change these settings manually using the Registry Editor. I'll just run this file and add the keys from it to the registry.
After restarting Windows, the problem should be resolved.
But this method, apparently, has one drawback - the fact is that on the forums there is information that these parameters in the registry are automatically adjusted by Windows and after the next reboot of the computer these parameters become irrelevant. This means that you will have to run this file every time you restart Windows.
I was unable to find more detailed information and in my case these parameters did not disappear anywhere. But it’s true, I didn’t have any problems with fonts. Therefore, if you use this method, I will be glad if you write in the comments about its effectiveness.
If the system really automatically corrects the corrected keys in the registry, then you can go the other way.
There is a small program that automatically changes settings in the registry every time the operating system starts.
I’ll be honest - I don’t like such programs, since it’s not known who makes them and what’s inside may also not be clear. However, I found this program on the Western Internet and then looked at reviews on English- and Russian-language sites. Everything seems to be clean, although of course I can’t guarantee it 100%. Online antivirus programs recognize the program as harmless. I think that's true.
On the program's website, the author claims that if we want to change the registry settings manually, they will be automatically changed by the system every second reboot.